
You already know the advantage of doing an IKEA's Sektion for the kitchen re-model - addition of a kitchen island.
Island additions are an amazing opportunity to increase functionality and flow of your kitchen work - smoother and better. It also offers a great opportunity to make a nice design statement - IKEA offers wide range doors and you can get pretty creative with the island geometry with the availability of the large panels in matching finishes - you can now make large surfaces look professional!
AND! AND!
I saw London Grey from Cesarstone in the showroom at IKEA Etobicoke! Yea....I got to say - Frosty Carrina and London Grey are my two favourite stones. These are 'premium stones' and if IKEA has them means that they can get you probably the best deal around - and you get an amazing discount [max 20%, with 3 appliances - kitchen event ON NOW].
Chapter 2 - HOW do I build my IKEA SEKTION ISLANDS
*EDIT: Here is the VIDEO LINK!
The advantages of my system are as follows:
A] Flexibility! of where you want to install - over any materials. ALWAYS check the floor if you are going to be drilling into it - cables? wiring? piping? YEA! IMPORTANT!
B] Simplicity! Once built, setting your cabinets is a breeze! And knowing that your levels are already established, you are able to focus your efforts elsewhere - like making things nice. Once the base is installed, the 'leveling portion' is done. Use a laser level on runs more than 4 feet.
C] Creativity! - with my system you can focus your creative energy on interesting kitchen island geometry - open up any fancy Italian design magazine and using the structure you can copy those!
Win! Win! WIN! - that's all I say!
Chapter 3 - the Drawings
A] I am attaching 3 drawings - they are progressive - I hope that they are clear enough - BUT I will supplement with videos - today or tomorrow.
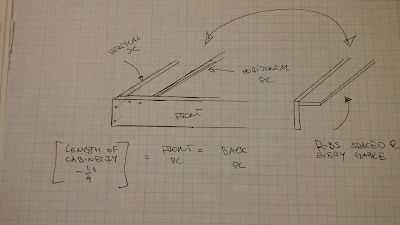
Let's start with this - 2 boxes side by side. This is a fairly common combination - PLUS I am partial to the 15/15 split - I just think it looks the cleanest PLUS you save on hardware [hardware can get expensive - as much as a SEKTION box! - $50!]

[please note - I omitted the front piece for clarity]
B] The secret of this system is that - IT IS ALL MADE FROM THE SAME DIMENSION plywood piece. Use 3/4" construction grade ply - try picking a nice flat sheet, but don't sweat it if there is some kinks in it. The way the base is built - ORIENTATION of the pieces IS THE KEY - it is SELF SQUARING!
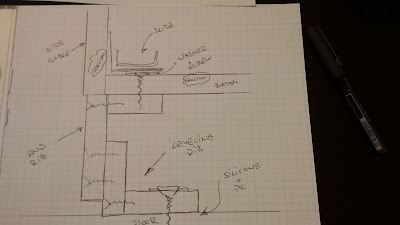
C] Here is the detail section - so the top portion is actually 'floating' over 'fixed points' - there is a reason why it is done this way. First reason is that this is super easy to execute - build the base and level the four courners - THEN you further secure it to the subfloor.
Chapter 2 - HOW do I build my IKEA SEKTION ISLANDS
*EDIT: Here is the VIDEO LINK!
The advantages of my system are as follows:
A] Flexibility! of where you want to install - over any materials. ALWAYS check the floor if you are going to be drilling into it - cables? wiring? piping? YEA! IMPORTANT!
B] Simplicity! Once built, setting your cabinets is a breeze! And knowing that your levels are already established, you are able to focus your efforts elsewhere - like making things nice. Once the base is installed, the 'leveling portion' is done. Use a laser level on runs more than 4 feet.
C] Creativity! - with my system you can focus your creative energy on interesting kitchen island geometry - open up any fancy Italian design magazine and using the structure you can copy those!
Win! Win! WIN! - that's all I say!
Chapter 3 - the Drawings
A] I am attaching 3 drawings - they are progressive - I hope that they are clear enough - BUT I will supplement with videos - today or tomorrow.
Let's start with this - 2 boxes side by side. This is a fairly common combination - PLUS I am partial to the 15/15 split - I just think it looks the cleanest PLUS you save on hardware [hardware can get expensive - as much as a SEKTION box! - $50!]

[please note - I omitted the front piece for clarity]
B] The secret of this system is that - IT IS ALL MADE FROM THE SAME DIMENSION plywood piece. Use 3/4" construction grade ply - try picking a nice flat sheet, but don't sweat it if there is some kinks in it. The way the base is built - ORIENTATION of the pieces IS THE KEY - it is SELF SQUARING!

C] Here is the detail section - so the top portion is actually 'floating' over 'fixed points' - there is a reason why it is done this way. First reason is that this is super easy to execute - build the base and level the four courners - THEN you further secure it to the subfloor.
